Wednesday 2 November 2016

Painting Samnite Infantry


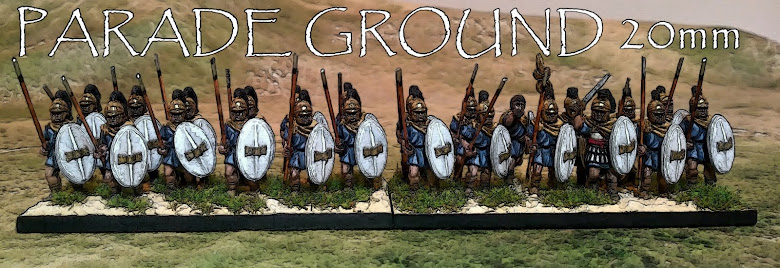
Roughly how I painted Italian Allied Legionaries:
  • Base coat with GW Tallern Flesh. 
  • Paint tunics various colours.
  • Paint armour, helmets, standard with VJ Brass.
  • Paint spear shafts Bronzed Flesh.
  • Paint Feathers black.
  • Paint leader's cloak with dark grey.

  • Apply GW Delvan Mud Wash.
  • Highlight skin with GW Tallern Flesh (face with GW Elf Flesh).
  • Highlight tunics with original colours.
  • Highlight armour, helmet and standard with VJ Old Gold.
  • Apply GW Flesh Wash to spear shafts.
  • Dry brush leader's cloak light grey.
  • Base coat spear tips and swords black, paint with GW Chainmail. 
  • Shields, base coat GW Deneb Stone/Bleached Bone/Space Wolves Grey, GW Mud Wash, highlight original colour.
  • Shield boss base coat with GW Boltgun Metal, highlight GW Mithril Silver.


Italian Allied Legionaries


The latest unit to the Legions of Rome or the mercenary contingents of Carthage. This contingent has been represented with Newline Designs 20mm Samnites standing. These miniatures come issued with clipped Scutum shields and I believe they are supposed to be the Samnites of the earlier wars Rome fought with the Oscan peoples of Southern Italy. However I'm going for the later 2nd Punic War era and issued the troops with a Roman oval Scutum shield. 

They come in 2 varieties and there is a 3rd standing pose in the Samnite range. The details are very crisp, they painted up easily and then lent themselves well to the mud wash.

I initially attempted to paint a variety of shield designs but the only one that was half decent was the laurel wreath design. The other designs I wasn't pleased with so to introduce variety I just used different colours.

With the Italian Allied Cavalry I swapped the standard with a vexillum but it looked a bit awkward at the join. This time however I went for disks which I think maybe a more Imperial Roman type of standard but it was an easy option to add to the standard. The trickiest bit was cutting the tiny disks which are cut from a cross section of a Hat sprue then super glued on. 

Again I undercoated with flesh to save time, which it did, but it still felt like a chore. Fortunately the rest of the painting was more enjoyable and I have a painting guide on my workshop blog. I tend to prefer more active poses however paiting and basing these models I have come to appreciate the humble standing pose they were a breeze to base and there are no spears hanging over the edge of the base. 

I have 2 x 32 man units of Samnite foot advancing ready to paint up. However the thought of undercoating my next units was putting me off continuing so I decided to give Army Painter primer spray a go and have ordered a flesh coloured and black tin. Hopefully this will give a quick basecoating option and give me a boost to get them painted. Meanwhile I have been highlighting and rebasing Spanish and Numidian cavalry so I will probably  post some updated pics of those units next.   

Monday 26 September 2016

Painting Ancient Italian Cavalry

This guide is going to be very simple and mainly to remind me of the general steps I took for Italian Allied Cavalry.
  • Undercoat horse and rider with black.
  • Base coat rider with GW Tallern Flesh. 
  • Base coat horses in various colours.
  • Paint rider's tunics and flag various colours.
  • Paint Armour VJ Brass.
  • Paint reigns, straps spearshafts dark brown.
  • Paint Feathers black.
  • Paint leader's cloak with dark grey.


  • Apply GW Delvan Mud Wash over horse and rider.


  • Highlight horses in original base colours (black with GW Granite).
  • Dry brush horses' mane and tail with original base colour. 
  • Highlight rider's skin with GW Tallern Flesh (face with GW Elf Flesh).
  • Highlight rider's tunic and flag with original colour.
  • Highlight armour with VJ Old Gold.
  • Highlight reigns, straps and spear shafts with light browns.
  • Dry brush leader's cloak light grey.
  • Base coat spear tips black, paint with GW Chainmail. 
  • Metal shields as above, apply transfer, gloss varnish.
  • Other shields, base coat GW Deneb Stone, GW Mud Wash, highlight original colour.
  • Shield boss base coat with GW Boltgun Metal, highlight GW Mithril Silver.

Allied Cavalry


These horsemen represent the Italian Allied cavalry. These miniatures are from Newline Designs 20mm Samnite and Etruscan range and there are 3 regular poses, 2 command poses and 2 horse variations. There is a nice variety in armour; triple disk, pectoral and muscle cuirass. They are probably meant to represent the Samnite cavalry that Rome fought against before the Punic Wars. The Allied cavalry equipment  by the second Punic War probably differed very little from their Roman contemporaries but it is nice to have some variation between the Roman and Allied cavalry units.  

These miniatures usually come with a small rimmed shield but I swapped them for a mix of Roman Parma shields, Celtic Cavalry shields and a Macedonian Aspis shield types. This was an attempt to bring them closer to the Roman cavalry whilst showing a bit of Greek influence. I think to use them for Rome's Samnite Wars they should probably be un-shielded like Hat's 1/72 Italian Allied Cavalry (currently in my plastic mountain and have spare shields for them!). 

The only other thing I swapped was the standard bearer's pole for a vexillum, which was a bit of a hash were I made the cut. The shield transfers are from Veni Vidi Vici, expcept the laurel wreaths design from an abandoned home made set, which needed painted over so acted more of a painting guide.

I managed to do these fairly quickly the steps I took are covered in more detail on my WIP blog. There wasn't much in ways of horse furniture and leather belts and straps which really helped speed up the process. I am continuing on with the Roman (and at times Carthaginian) Allies theme by working on a unit of heavy infantry.


Monday 12 September 2016

Hat 1/72 and Newline Designs 20mm Carthaginian Comparisons


I received a request on Benno's Figures Forum, where I posted about my African Mercenaries with the blue shields, about comparison shots between Hat 1/72 figures and the Newline Design 20mm figures. I am popping them here in the workshop for future reference.

I have said before how I collected 1/72 Ancient miniatures initially following army lists in Field of Glory supplements. However I looked into filling blanks at the time with Newline Designs 20mm lines, namely the Thureophoroi and I asked about African Veterans in Roman armour. After receiving the metals I loved them and over the years I have been collecting Newline miniatures with 1/72 plastics as secondary.

Newline miniatures tend to be chunkier than the Hat plastics depending on the sculptor. Earlier Newline miniatures seem noticeably smaller than 1/72 and I think that as quite a lot of people asked Sean at Newline about how close they were to 1/72, later miniatures were made a bit larger and fit better height wise.

Some Hat figures appear to be full of action, mid-slash, running throwing etc. and some of the earlier Hat Ancients have shields cast on which lead to flat looking and sometimes awkward poses. Newline poses tend to be more conservative with most heavy foot either standing or advancing tucked and hunched behind their shield. These factors also accentuate the size difference.

I generally don't mix manufactures on the same base/unit but I would definitely mix within an army. I have seen them mixed within units and I think they mix well when painted and based in a consistent manner.

Some examples I have seen around the web:


Sunday 11 September 2016

Painting Libyan, Liby-Phoenician, Carthaginian or African Spearmen etc.


Painting guide for African heavy infantry.

GW = Games Workshop Citadel Colour, VJ = Vallejo.

1. Undercoat with GW Foundation Flesh.
2. Linothorax with GW Foundation Stone.
3. Tunic, crests, cloaks with VJ Red.
4. Straps, scabards, spear, in GW Dark Brown.
5. Metal, helmet, greaves, armour, spearbutt with VJ Brass.
6. Sandles with light brown, hair with black/brown.


7.   Whole figure GW Brown Mud Wash.

8.   Highlight Skin with GW Foundation Flesh except face, use GW Elf Flesh.
9.   Highlight linothorax with GW Foundation Stone.
10. Highlight tunic, crests, cloaks with VJ Red.
11. Highlight straps with GW Vermin Brown, scabards, spear with GW Snakebite Leather.
12. Highlight metal helmet, greaves, armour with VJ Old Gold.
13. Speartip, swords with GW Chainmail.


Shields:

1. Undercoat with VJ Light Blue.
2. Wash Front with GW Blue Wash.
3. Paint alongside of spine with GW Ice Blue.
4. Highlight VJ Light Blue.
5. Paint Shield Boss GW Boltgun Metal.
6. Highlight shield boss GW Mithril Silver.
7. Apply transfers.
8. Highlight VJ Red if neccessary.
9. VJ Matt Varnish shield.

Carthage's Professionals


Why get citizens to fight when you can employ full time mercenaries? Carthage employed or levied North Africans to serve in her armies and here are a few units of heavy infantry representing Libyan, Liby-Phoenician or Punic spearmen  in 20mm by Newline Designs.


These spearmen types are usually associated with a large round shield like the ones carried by Hoplites but I liked the idea that they could have been using the oval thureos so went with the Iberian style Scutarii shield provided from Newline's Scutarii figures. I also have some pikemen miniatures set aside to be African Spearmen with Hoplite style shields for future projects.

These units stem from updating these 32 African foot to the double DBX style basing I have been using.  I dug around my lead mountain and organised the African Infantry into groups of 32 including 3 command figures. I set aside 2 units worth with Macedonian commands for future Hellenistic armies, then grabbed 6 Carthaginian command figures and 26 African Infantry for the pictured units.

I hoped to have them all in the Thracian style helmet but I was 6 short so I used the African wearing the conical looking helmet with cheek plates. I attempted to add a visor using PVA glue built up in layers to give them a more Hellenistic look. I have made a separate post on the PARADE GROUND WORKSHOP on how I painted the miniatures. With the 32 older miniatures I removed the shields, highlighted and generally got them to fit in with the newly painted miniatures.

The shield transfers are a mix of 15mm Hellenistic Veni Vidi Vici transfers and some home brew transfers.

Although I achieved what I set out to do they are too uniform for the ancient world, even for freshly raised troops. However I like the uniformed contrast to my Roman Citizen soldiers so decided to go for artistic rather than historical painting. Hellenistic rulers sometimes gave military cloaks as 'gifts' to mercenaries. I like the idea of Carthage recruiting for their armies with a promise of regular pay and all clothing and equipment provided for service... maybe something like this happened to some degree.  Also uniformity helps get the production line moving. Next on the bench are the Italian Allies cavalry and infantry.


Tuesday 9 August 2016

To Campus Martius


Yet more Mid Republican Roman Legionaries in 20mm by Newline Designs and the bulk of them done now with just Triarii and the odd base of Hastati and Princepes left unpainted. This post is reporting 13 completed bases of Hastati and Princepes each with 8 miniatures. Its the biggest batch of miniatures I have painted at once and I'm not sure if I could pull it off again but it was satisfying after completing so many at once. 

The first two pictures were attempts to capture the majority of the minis on my wife's camera phone most of the following closeups are taken with the Nikon's macro feature. The picture below shows some of the main differences from my previous postings of completed legionaries. Namely, I did some minor work twisting the centurions' heads and sword arms from their leading fellow legionnaires pose, to a more aggressive stabbing pose. I also issued the standard bearer with a plastic standard from the Hat 1/72 Roman Command set as I thought it would look better than my previous attempts at painting a vexillum free handed. 

When I was dividing the troops for each base I found I was one short, I drafted a spare veles (above inset) twisted his arm a bit and gave him a sword and scutum. I decided to use him for an experiment to reduce painting times for future miniatures. The main change was to undercoat him with foundation flesh paint, for some reason I find painting flesh on ancients an ordeal, probably because there is so much on show. With the flesh under/base coat done I blocked in the colours red/brown/brass; applied a brown wash then highlighted the relevant colours. I completed the shield at the end with the rest of the legionaries. 

Overall he didn't take too long to complete and I think undercoating in a foundation flesh paint will save a lot of time with my next few units. I am now working on updating, rebasing and adding to my Carthaginian African heavy foot in the hope of creating 2 units of 4 bases each. But at least for now there are more Romans ready to assemble at the Field of Mars.
 

A close up of some of the fresh Hastati:


And below most of the Roman foot so far (camera phone):


Sunday 31 July 2016

Men of Gaul


I have been trying my best to avoid being distracted by the internet and games. The computer going off for repair the other month helped so I began to work on my Gallic troops and Romans en mass. The posting is a bit of a cheat, most of the figures were completed in the past and are reappearing because of the rebasing I am slowly working through. I did however spruce them up, added some patterns and highlighted shields and Helmets. 

I did paint most of the mailed nobles recently and I finished them and based them along with a lot of Romans which will follow in the next post. With these Newline Design 20mm Gauls based up the Punic War Project was back in full swing.

I have also tried with these next few posts to improve my photography. I struggle to get nice crisp pictures except on bright days and I don't have much in the way of a gaming table or terrain. This year I picked up a green throw which I thought was a nice natural colour, something that can be popped on the dining table and very easily stowed away. It's no gaming mat but it will hopefully do the job for now for a grass plain. I have attempted to add some kind of sky to the background using a t-shirt, so at least my backdrops have a bit more colour to them.

With the cameras I have been trying my wife's new camera smart phone and a newish digital camera given to me by my sister, who feels she doesn't need it because of her smart phone. The digital camera has an excellent macro mode and I feel I have gotten a few good close ups as can be seen below. The pictures at the top of this post are from the digital camera using the flash, which I think is too harsh for taking pictures of miniatures but overall they are ok. Going forward I'll work on using the macro function to better effect. 


Tuesday 19 April 2016

Seleucid Phalanx


Getting back into 20mm ancients but still not quite up for the Punic Wars I opted to do a bit of work on the Macedonian Wars. These pictures show 3 x16 units of 20mm ancients from Newline Designs, each unit is mounted on a 60mm square base.

There are two poses used from Newline's Carthaginian range of African Pikemen. The front rankers come in 2 variations one in the helmet seen above and another in a helmet without a crest. The second rank poses comes in one variation. If combined with the Macedonian codes a varied phalanx could be modelled but I went for uniformity. Despite the dubious historicity of this level of uniformity it made them so much quick and easier to paint.

I didn't use the shields that came with the miniatures. I instead used drawing pins, 9.5mm are an ideal size for 1/72 scale roughly the same shape and size as Hat 1/72 Phalangites, Also they were already the right colour.

I still intend to eventually complete one more 16 man unit in blue tunics and two more units as the Silvershields. I'm now working on updating, basing and adding to my Gallic foot collection in an attempt to kick start the Punic Wars Project off again. 

Tuesday 5 April 2016

Soviet Infantry 1980s


 These Heroics and Ros 6mm Soviet Airborne Infantry were the final part of the break from ancients. I think the time and detailing of these tiny soldiers got me back into the detailed work of my 20mm ancients.


These are nice figures they are moulded with the padded soviet airborne helmet but I don't have any of the vehicles for airborne regiment so I decided to paint them up as generic infantry in an attempt at KML style uniform with helmets. For the helmets I just blobbed some dark green paint on a couple of times which seemed to do the trick and the uniforms a light green with some beige dots. The webbing was done in a sandy colour and were washed with a brown wash to give some shading.


I have some more H&R Soviet infantry codes to paint up they are trimmed and ready to be based so this is not the end of the moderns I was just ready to return to 20mm ancients. I also have ready the infantry's fighting vehicles BMP1's and BMP2's when I'm ready from another break from 20mm ancients. I liked how quickly I could paint up the 6mm AFV's and the boost to productivity was a nice change from projects that seem to drag on with multiple colours and highlights which is not a bad thing just time consuming. 


Monday 4 April 2016

T62 & T62M


Continuing with the Cold War Soviet armour I followed the T-55's with a batch of T-62's then T-62M's all from Scotia miniatures. The only difference I can see between the two is that the T-62M's have armoured side skirts and some extra armour on the turrets but both are nice sculpts.

I kept the paint scheme simple as possible to enable quick completion and based simply more to protect the model over any particular ruleset. They were all completed over the Christmas period as part of a break from 20mm-1/72 ancients. I finished this diversion with some Soviet Infantry which will be up next.